
Draw better zone orders
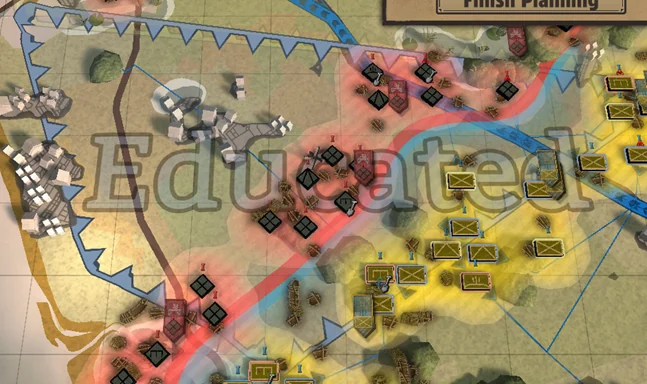
Use Balanced Hold when protecting a sector. Use Seize Ground for a deliberate advance, then check the zone size, assigned battalions and exposed flanks.
Zone orders let you give a formation an area to work in instead of describing every movement separately. A zone still needs a tactical purpose, suitable battalions and a boundary that makes sense. If troops keep pushing when you meant to hold, begin with the selected tactic rather than repeatedly redrawing the same area.
Hold and advance are different jobs
The developer describes Seize Ground as an aggressive advance that can continue into unfavourable conditions. Balanced Hold advances more cautiously, considering opposition and secure flanks. Use that distinction to choose a job for the sector. A boundary alone does not communicate that you want the force to stop taking risks.
Before choosing, ask what must remain true if the enemy gives ground. Should the assigned formation follow immediately, or should it preserve the line and wait for the adjacent sector? If the latter is essential to the plan, an aggressive tactic deserves particular scrutiny. The official zone diary describes the tactic button used to change behaviour.
Read the allocation before the prediction
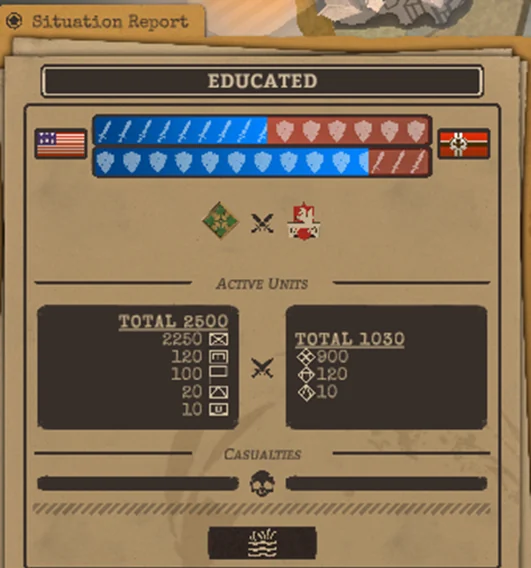
The published interface lets you drag a battalion into a zone's allocation area. It also presents attack and defence predictions separately. Inspect the assigned force before interpreting either prediction: an impressive result is not useful if it describes a different group from the one you meant to commit.
Use the prediction as a prompt to inspect conditions. Ask which enemy and friendly troops it includes, how the sector sits on the map and whether the main task requires attacking or defending. Avoid treating a number as a promise about the next phase. Your plan may change the very conditions on which that display is based.
Shape a sector around one task
The developer shows reshaping a zone by holding right-click on its edge, including during execution. Follow the control guidance in your build. A smaller sector can make a task easier to understand, but only if it still covers the ground needed for the mission.
Consider a formation assigned to secure a road approach and also occupy a distant stretch of ground. Those may be different jobs with different support requirements. Before making the zone wider, decide which job is immediate. You can then choose whether to divide the responsibility, change the allocation or postpone the second movement. This is a planning suggestion rather than a prescription for a particular scenario.
A five-point check before execution
- Purpose: can you state the zone's job in one sentence?
- Tactic: does the behaviour match an advance or a cautious hold?
- Allocation: are the intended battalions actually assigned?
- Edges: do the boundaries expose ground you did not intend to contest?
- Support: can the formation keep its headquarters and supply relationship workable as it moves?
Try this check on one sector before expanding the plan across the map. If you cannot explain one zone, adding several others usually makes the result harder to diagnose. A simple plan that you understand is a useful starting point for a more ambitious operation.
When a zone appears to do nothing
First inspect the active order and execution state. The diary illustrates a gear icon for an executing plan, but your build's tutorial and tooltips determine the exact meaning of its indicators. Then check allocation and the condition of a company that should participate. A selected area without the intended battalions is a different problem from a correctly assigned formation that cannot make progress.
If troops are gathering at one location, compare that location with the task and boundary. Has the task reached its stopping point? Are units still arriving? Are you expecting a later phase that has not begun? These questions help distinguish a planning mismatch from unexplained behaviour. They do not establish a universal workaround.
Revise one decision at a time
Suppose the main sector pushes forward while the adjacent sector stays behind. Ask whether the difference follows from their tactics, allocations or current opposition. Change the relevant decision before also relocating the headquarters and replacing the whole operation. If circumstances force several changes, make them, but avoid attributing the next result to one setting with certainty.
For a continuing advance, reassess the route behind the sector. A successful boundary change can lengthen that route and create a new flank. Read the supply guide before extending a formation already struggling to receive supplies. For a holding sector, use the defence guide to choose a frontage the assigned force can support.
Zone orders and older planning controls
Zone orders are described as an optional alternative to the existing timeline system. An older preview's account of planning phases should not be used to override the current interface. When a tutorial asks for a particular order, follow that tutorial before substituting a zone plan. If controls remain inconsistent, report the version, scenario, selected formation and exact steps through Steam discussions.