
Hold a line you can support
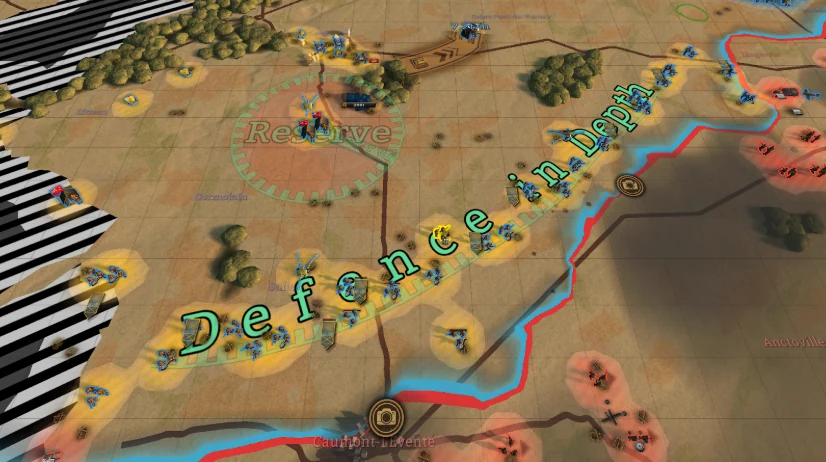
Choose a defensible frontage, let infantry prepare the line and keep a reserve able to reach the threatened route. Protect the depot behind the position.
A defensive plan should protect the mission's essential ground and keep a force available to respond. A long line with every unit committed can look reassuring until the enemy attacks the part with no useful support or route for a reserve. Begin by choosing what the line must accomplish.
Choose the ground and the frontage together
The developer describes defensive benefits from towns, forests and elevation, with different drawbacks on poor ground such as marshes or beaches. Stationary troops can entrench, engineers assist preparation, and bombardment can degrade fortifications. A position's value therefore depends on the ground, preparation and force that will occupy it.
The defence diary illustrates those mechanics. Before choosing a line, inspect the enemy approach as well as your own position. Ask whether the assigned force can cover the necessary frontage without leaving the mission's route or objective exposed.
A shorter line can be a useful trade
Giving ground is a decision about what the new position preserves. It may make a line easier to support, but it may also surrender something the mission requires. Read the objective before deciding that a tidier frontage is automatically better. Compare the two positions by the work they require from the available force.
For a planning exercise, imagine one position covers a wide approach while another protects the same essential route from a narrower sector. Ask what you lose by moving and whether the reserve can reach the second position more usefully. The question is not whether retreat is always good. It is whether the trade improves the actual defensive task.
Give preparation time to matter
Inspect the fortification state rather than assuming a unit became prepared as soon as it stopped. The developer shows fortification information in the unit panel. Your build's tooltip is the place to check the current value. A position under continuing bombardment also deserves reassessment; yesterday's prepared line is not a permanent condition.
When choosing where to prepare, consider whether the force is likely to remain there for the intended phase. Repeatedly moving it between attractive positions may prevent the plan from gaining the value you expected from preparation. If a movement is necessary, make it for a clear purpose and review the resulting defensive state.
Keep a reserve with a route and a job
A reserve is useful when you know what it can respond to. Identify the threatened approach, depot or junction it should help protect, then inspect how it would reach that place. A reserve positioned far from every likely problem may be a spare force without a usable intervention plan.
Do not commit it merely because another sector looks busy. Ask whether the threatened task is essential and whether moving the reserve creates a worse exposure elsewhere. If the main line needs the reserve continuously to function, review the original allocation. You may have built a line that requires every available formation rather than a line with depth.
Protect the logistics behind the line
The depot supporting the defence is part of the position. Consider what happens if the enemy reaches it, what force protects its approach and how quickly your reserve can respond. A forward depot can help delivery but can also create a vulnerable obligation. The supply guide explains why depot stock alone does not prove the defending formation is well supplied.
Check the headquarters too. A line can appear intact while its command and supply relationships have become dangerous. Inspect those relationships after an enemy penetration instead of judging the position only by the visible frontline.
Diagnose a local collapse
| What changed | Inspect before replacing the whole plan |
|---|---|
| One sector gives ground | Assigned force, terrain and its active task |
| A prepared position loses resilience | Current fortification state and bombardment |
| The depot is threatened | Approach protection and reserve route |
| Units advance when you meant to hold | Zone tactic and boundary |
| Several positions weaken together | Shared supply or headquarters conditions |
These checks help identify the failed job. They are not proof of one cause in every battle. If you change the tactic, allocation, line and depot simultaneously, the next outcome may be harder to explain. Make a focused correction where possible and observe whether it solves the specific problem.
Decide when to counterattack
A counterattack should have a limited purpose: restore an essential position, remove a threat to the route or regain a workable line. Decide what will stop the attack before it becomes a pursuit that pulls the reserve away from the defensive task. The force that wins the contact still needs a plan for the resulting ground.
Check support and supply before committing. Use combined arms to think through the contact and zone orders to choose the behaviour of the responding sector. After the intervention, review whether the original defensive job is now easier to perform. Taking extra ground is useful only when it helps the mission you are defending.